The Ultimate Seven Layer Dip: A Crowd-Pleasing Tex-Mex Classic
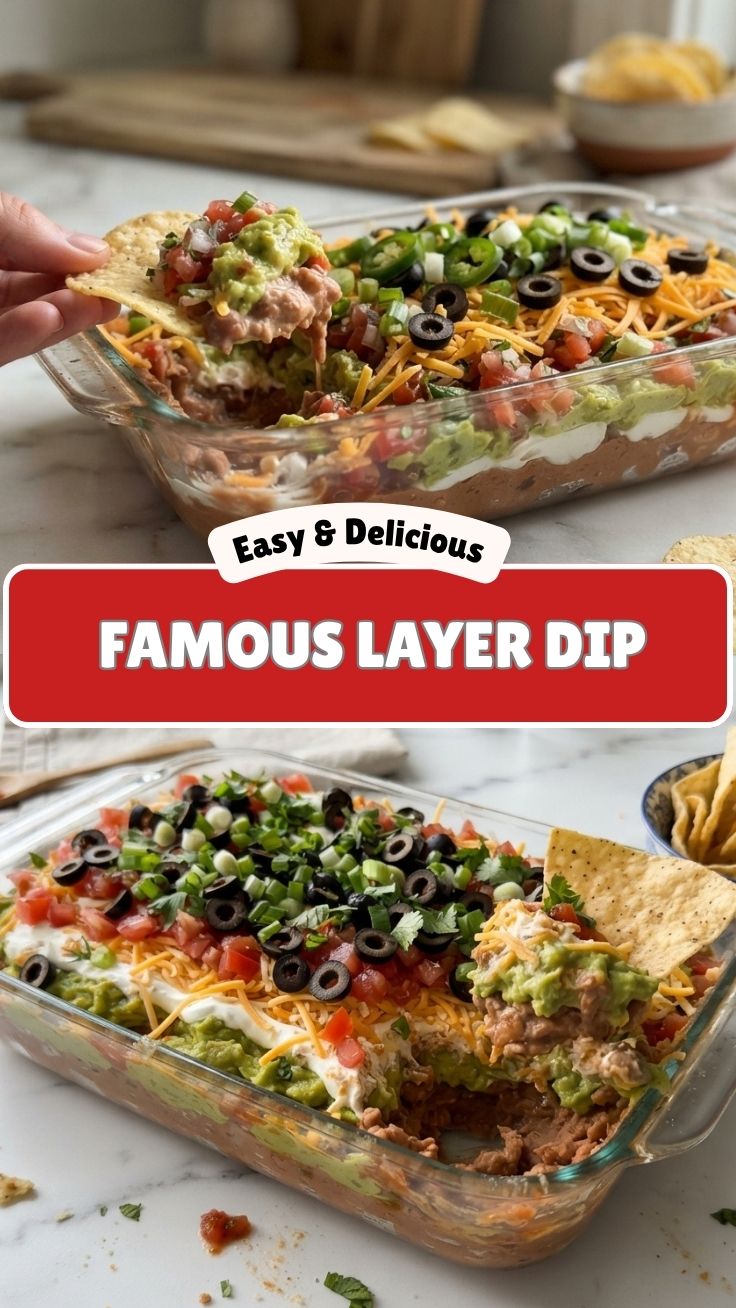
Have you ever shown up to a party empty-handed, only to realize the snack table is missing that one irresistible dish everyone fights over? The Seven Layer Dip is that dish—a vibrant tower of refried beans, guacamole, sour cream, salsa, cheese, olives, and green onions. Making it at home isn’t just cheaper; it lets you control every layer for peak freshness. In fact, this easy seven layer dip recipe comes together in under 20 minutes, yet delivers restaurant-quality flavor. Whether you’re hosting game day or a casual get-together, mastering this dip is a game-changer. And when paired with other Tex-Mex appetizers, your spread becomes unforgettable.
Ingredients & Kitchen Tools
Ingredients (serves 8–10):
– 16 oz refried beans – Traditional pinto or black beans work. Use vegetarian if desired.
– 1 cup sour cream – For tanginess. Greek yogurt is a lighter swap.
– 1 cup guacamole – Store-bought or homemade; add lime juice to prevent browning.
– 1 cup salsa – Try medium heat for balance; drain excess liquid to avoid soggy layers.
– 1½ cups shredded cheddar & Monterey Jack blend – Pre-shredded is fine, but fresh shreds melt better.
– ½ cup canned sliced black olives – Drain well.
– 3 green onions, sliced – White and light green parts.
– Optional: 1 teaspoon chili powder, ½ teaspoon cumin for extra depth.
Kitchen Tools:
– 9×9 or 10-inch glass dish – Allows clear layers. A pie plate works too.
– Rubber spatula – For even spreading.
– Chef’s knife & cutting board – For slicing onions.
– Small bowls – Prep each layer separately.
Prep Time & Cooking Schedule
– Prep time: 15 minutes (if guacamole is pre-made)
– Assembling time: 5 minutes
– Chill time (optional): 30 minutes – allows flavors to meld
– Total active time: 20 minutes
No cooking is required! This make-ahead dip can be prepped hours before serving. For best texture, assemble 30–60 minutes before guests arrive, then refrigerate. Serve cold or at room temperature.
Step-by-Step Instructions
1. Prepare the base – Spread the refried beans evenly across the bottom of your dish. Warm the beans slightly (microwave 30 seconds) for easier spreading, but let them cool before adding other layers.
2. Layer the guacamole – Gently spread the guacamole over the beans. To keep it green, press plastic wrap directly on the surface before adding the next layer.
3. Add sour cream – Drop spoonfuls of sour cream over the guacamole, then spread carefully. For a spicy kick, mix ½ teaspoon hot sauce into the sour cream.
4. Top with salsa – Spoon salsa evenly. If your salsa is watery, strain it first using a fine-mesh sieve. This prevents the “river effect” where liquid pools at the bottom.
5. Sprinkle cheese – Evenly cover the salsa with shredded cheese. The cheese acts as a barrier, keeping the olives and green onions from sinking.
6. Finish with olives & green onions – Scatter olives and green onions. For visual appeal, arrange olives in a ring pattern.
7. Chill (optional) – Refrigerate at least 30 minutes. This easy seven layer dip recipe becomes firmer and easier to scoop. Serve with tortilla chips or veggie sticks.
Flavor tip: Season each layer lightly with salt and cumin between spreads. Taste as you go—this method elevates the entire dip.
Nutritional Benefits & Advantages
This best Tex-Mex appetizers selection offers surprising nutritional wins. Refried beans provide fiber and plant-based protein (about 8g per half-cup). Avocados in guacamole deliver heart-healthy monounsaturated fats and potassium. Salsa supplies vitamin C and lycopene from tomatoes. Using Greek yogurt instead of sour cream cuts saturated fat while adding probiotics. Even black olives contribute iron and healthy fats. The balanced macros make it a satisfying snack that won’t spike blood sugar.
Tips, Variations & Cooking Advice
– Dairy-free version – Use vegan sour cream (cashew-based works well) and dairy-free cheddar shreds. Coconut yogurt adds a slight sweetness.
– Gluten-free – Naturally GF; just double-check bean cans for cross-contamination.
– Protein boost – Add ½ lb seasoned ground beef or shredded chicken on top of the beans.
– Spice level – Mix chipotle powder into the sour cream or use habanero salsa for heat lovers.
– Layer order swap – Try putting salsa under the guacamole to keep beans from absorbing too much liquid.
– Mini servings – Layer in small mason jars for individual party portions. Perfect for picnics.
– Temperature variation – Serve warm by baking at 350°F for 10 minutes after assembly (skip guacamole until after baking to avoid mushiness).
Common Mistakes to Avoid
– Watery layers – Always drain salsa and olives. Excess liquid turns layers into soup.
– Guacamole browning – Press plastic wrap directly on the guacamole layer before adding sour cream. Alternatively, brush with lime juice.
– Soggy chips – Serve dip at room temperature. Cold dip stiffens, causing chips to break.
– Uneven spreading – Use an offset spatula for smooth, even layers. Rushing this step ruins presentation.
– Skimping on seasoning – Unseasoned beans taste flat. Stir in ½ teaspoon garlic powder or cumin into the beans.
– Ignoring chill time – At least 15 minutes in the fridge helps layers set. Without it, the dip collapses on the first scoop.
Storage & Meal Prep Tips
– Refrigeration: Cover tightly with plastic wrap. The dip stays fresh for 2–3 days, though guacamole may darken (still safe to eat). To slow browning, press plastic wrap directly on the surface.
– Freezing: Not recommended – sour cream and guacamole separate upon thawing.
– Meal prep hack: Pre-chop all toppings and store in separate containers. Layer dip fresh on the day of serving. This yields best texture.
– Reheating: If you desire warm dip, remove the guacamole first (it’s best cold), then microwave or bake the remaining layers. Add fresh guacamole after heating.
– Leftover chips: Store chips in an airtight container at room temperature. Never refrigerate them; they become stale.
Conclusion
Mastering this easy seven layer dip recipe transforms any gathering into a fiesta of flavor. By layering fresh ingredients, controlling moisture, and customizing heat, you create a dip that rivals any store-bought version. It’s one of the best Tex-Mex appetizers because it balances creamy, crunchy, cool, and spicy elements in every bite. Plus, its make-ahead flexibility reduces party stress. Try this recipe for your next game day or taco night, and watch the dish disappear. Share your creation on social media with #SevenLayerDip – your friends will thank you.
FAQs
1. Can I make seven layer dip a day ahead?
Yes, but wait to add the guacamole until an hour before serving. The rest can sit overnight covered in the fridge. Stir the guacamole before spreading to refresh it.
2. What if I don’t have refried beans?
Substitute with black bean purée (drain and blend canned black beans with a tablespoon of olive oil and cumin). It’s less salty but equally flavorful.
3. How do I stop the dip from getting watery overnight?
Use thick salsa (pico de gallo or fire-roasted crushed tomatoes). You can also spread a thin layer of cream cheese between the beans and guacamole to absorb excess liquid.
4. Can I serve this dip warm?
Absolutely. Assemble without guacamole, bake at 350°F for 10 minutes, then top with fresh guacamole afterward. The cheese melts beautifully.
5. My dip looks muddy – how to fix layers?
Use a clear glass dish to see layers. Spread each layer with a gentle, even hand. If layers mix, chill for 30 minutes – the dip firms up and becomes clearer. For next time, add a thin layer of shredded lettuce between cheese and toppings to separate colors.
Quick way to grow Seven Layer Dip in 7 Minutes
Ingredients
Equipment
Method
- Spread the refried beans evenly onto the bottom of a large serving dish.
- In a separate bowl, mix the mashed avocados with a pinch of salt and spread this mixture as the second layer over the beans.
- Combine the sour cream with the taco seasoning, then spread it over the avocado layer.
- Sprinkle the shredded cheddar cheese evenly over the seasoned sour cream.
- Evenly distribute the diced tomatoes over the cheese layer.
- Scatter the sliced green onions and black olives over the tomatoes.
- Drizzle salsa over the top layer to finish the dip, and serve immediately with tortilla chips.