The Ultimate Guide to Authentic Texas Beef Chili: A Bowl of Lone Star Comfort
Is there anything more satisfying than a deep, savory bowl of chili that warms you from the inside out? The kind that fills your kitchen with the aroma of toasted cumin, smoky chiles, and slow-simmered beef. While many versions exist, nothing compares to the bold, no-bean, beef-forward nature of a true Lone Star classic. Preparing this iconic dish at home isn’t just about following a recipe; it’s about mastering a craft that transforms humble ingredients into a rich, complex stew. By cooking from scratch, you control the quality of the ingredients, adjust the heat to your preference, and unlock layers of flavor that no canned version can match. This comprehensive guide will walk you through every step to make an unforgettable Texas Beef Chili that rivals the best chili parlors in the state, a dish closely related to the broader category of Chili con carne but with a distinctly Texan attitude.
Ingredients & Kitchen Tools
To achieve that perfect balance of heat, depth, and texture, gather the following components. Quality matters here, so choose wisely.
Main Ingredients:
– 2 lbs beef chuck, cut into ½-inch cubes – Opt for well-marbled chuck; it renders fat that builds flavor and stays tender after long simmering. Substitution: brisket or short rib, trimmed of excess fat.
– 4 dried ancho chiles – These provide a sweet, raisiny base heat. Toast them briefly to unlock oils. Sub: 3 tbsp ancho chili powder plus 1 tsp smoked paprika.
– 2 dried guajillo chiles – They add a bright, tangy heat with a hint of berry. Sub: 2 tbsp guajillo powder or 1 chipotle in adobo (for smokier heat).
– 1 large yellow onion, diced – Essential aromatic base. Sub: 2 shallots or 1 leek (white parts only).
– 6 cloves garlic, minced – Fresh is non-negotiable. Pre-minced jars lack pungency.
– 1 (14.5 oz) can fire-roasted diced tomatoes – Adds acidity and smokiness. Sub: 1 cup fresh tomatoes, charred under broiler.
– 4 cups beef broth – Homemade or low-sodium store-bought. Avoid high-sodium broth; you control salt later.
– 2 tbsp tomato paste – Deepens umami and thickens. Sub: 1 tbsp soy sauce plus 1 tbsp water for umami.
– 2 tbsp cumin seeds, toasted and ground – Whole seeds toasted fresh are far superior to pre-ground. Sub: 2 tsp ground cumin, but add earlier.
– 1 tsp dried oregano – Mexican oregano preferred for its earthy, citrusy notes. Sub: Mediterranean oregano (use half amount).
– 2 tbsp masa harina – A fine corn flour that thickens and adds subtle corn sweetness. Sub: 1 tbsp all-purpose flour or 1 crushed corn tortilla.
– Salt and black pepper – To taste, but add salt gradually as broth reduces.
Kitchen Tools:
– Large Dutch oven or heavy-bottomed pot – Cast iron or enameled cast iron retains heat evenly. Avoid thin stainless steel; it scorches easily.
– Sharp chef’s knife and cutting board – Clean, precise cuts reduce cooking time variance.
– Slotted spoon or spider skimmer – For browning beef in batches without crowding.
– Blender or immersion blender – For pureeing chile sauce. An immersion blender works directly in the pot and requires less cleanup.
– Small skillet – For toasting whole spices and dried chiles. Dry toasting releases essential oils.
– Measuring spoons and cups – Accuracy matters, especially with chili powder blends.
– Fine-mesh strainer – Optional, for straining chile puree if you prefer a silky texture (I skip this for more rustic consistency).
Prep Time & Cooking Schedule
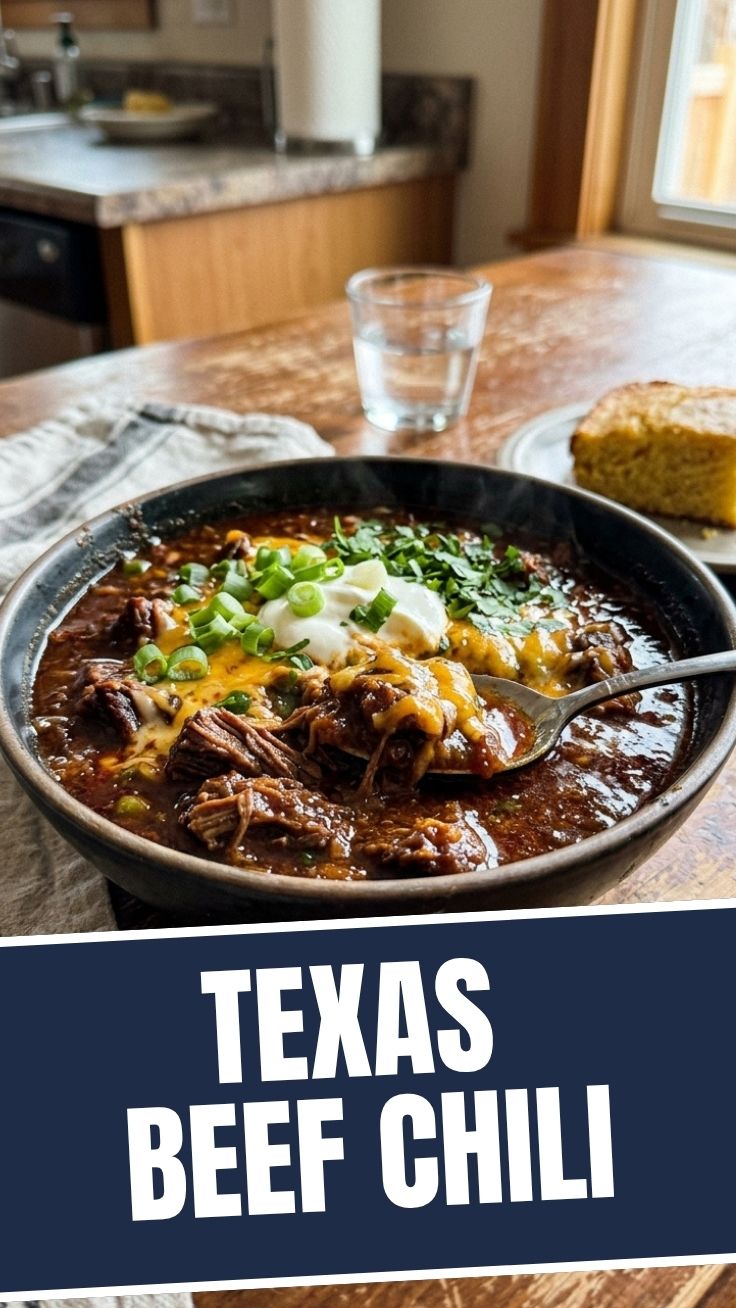
Planning ahead is key to stress-free cooking. Here’s a realistic timeline to help you orchestrate your chili-making session.
– Active Prep Time: 30–40 minutes – This includes toasting chiles, chopping beef (you can ask your butcher to cube chuck for a small fee), dicing onion, mincing garlic, and measuring spices.
– Cooking Time: 2 to 2.5 hours – The beef needs low, gentle heat to break down connective tissue. Rushing this phase yields tough meat.
– Resting Time: At least 30 minutes after cooking – Chili always tastes better the next day as flavors meld. Even a 30-minute rest allows the stew to thicken and deepen.
– Total Time: About 3 to 3.5 hours from start to finish (including rest).
Suggested Schedule:
– Day Before (Optional but recommended): Cube beef, toast and grind spices, and make chile puree. Store in airtight containers in the fridge. This cuts active time on cooking day by 20 minutes.
– Day Of – 3 hours before serving: Start cooking. Begin browning beef at 3:00 PM to serve by 6:00 PM.
– During Cooking: You have about 2 hours of unattended simmering after the initial browning. Use this time to prep toppings (shredded cheese, diced onion, cilantro) or make cornbread.
Texture Cues:
– When you first add broth, the chili will look thin. Don’t panic.
– After 60 minutes, the beef should be fork-tender but pieces should hold their shape.
– After 90 minutes, the liquid will reduce by about a third, and the chili should coat the back of a spoon.
– If too thick after resting, thin with warm broth or water. If too thin, simmer uncovered for 10–15 minutes more.
Step-by-Step Instructions
Now, let’s get cooking. Pay close attention to temperature control, as this is where most home cooks deviate from perfection.
Step 1: Prepare the Chile Base (15 minutes)
Wipe the dried ancho and guajillo chiles clean with a damp paper towel to remove dust. Remove stems and seeds (seeds add bitterness and uneven heat, but you can reserve a few for extra kick). In a small skillet over medium heat, toast the chiles for 30–60 seconds per side until they become fragrant and slightly puffed. Do not burn; they turn acrid instantly. Transfer to a bowl and cover with 2 cups of hot water (not boiling). Let them soak for 10–15 minutes until softened. Meanwhile, in the same skillet, toast the cumin seeds until fragrant (about 1 minute), then grind them using a mortar and pestle or spice grinder.
Step 2: Brown the Beef (20 minutes)
Pat the cubed beef dry with paper towels. Season generously with salt and black pepper. Heat 1 tbsp of oil (vegetable or avocado) in your Dutch oven over medium-high heat until shimmering. Brown the beef in batches—do not overcrowd the pot. Each piece needs contact with the hot surface to develop a deep brown crust. Work in 3–4 batches, adding more oil as needed. Use slotted spoon to transfer browned beef to a plate. You want fond (brown bits) on the bottom of the pot—this is flavor gold.
Step 3: Build the Aromatic Base (10 minutes)
Reduce heat to medium. Add a splash of broth to deglaze the pot, scraping up all fond. Add the diced onion and cook for 5 minutes until translucent. Add minced garlic and tomato paste; stir constantly for 1 minute until paste darkens slightly. This step is crucial for deepening umami.
Step 4: Create the Chili Puree (5 minutes)
Transfer the soaked chiles along with about 1 cup of soaking liquid to your blender. Add the fire-roasted tomatoes and 1 cup of broth. Blend until completely smooth. Pour this mixture through a fine-mesh strainer if you prefer no seeds or skins; I usually skip this for more texture. Add the puree to the pot along with the remaining broth, ground cumin, oregano, and a pinch of salt. Stir well.
Step 5: Simmer the Chili (90 minutes to 2 hours)
Return the browned beef and any accumulated juices to the pot. Bring the chili to a gentle simmer—small bubbles breaking the surface but not a rolling boil. Boiling will toughen the beef and cause the liquid to reduce unevenly. Partially cover the pot (leave a crack for steam to escape) and reduce heat to low. Let it simmer for minute. This process is what defines authentic Texas Beef Chili—the slow coaxing of flavor from simple cuts of meat, a method that elevates Chili con carne to its boldest expression.
Step 6: Thicken and Finish (5 minutes)
After 1.5 hours, taste a piece of beef—it should be tender but not falling apart. If firm, continue cooking. Once tender, stir in the masa harina mixed with ¼ cup of warm broth (this slurry prevents lumps). Simmer for 10 more minutes uncovered to thicken. Adjust salt and pepper. For extra depth, add 1 tsp of fish sauce or a splash of strong coffee—these are stealth umami boosters often used by competition chili cooks.
Temperature Control Tip: If your chili seems too thin after 2 hours, do not add flour directly; it creates a gluey texture. Instead, use masa harina slurry or let it simmer uncovered for 15 minutes to reduce naturally.
Nutritional Benefits & Advantages
A bowl of this chili is not just soul food; it offers substantial nutritional value. The star ingredient, beef chuck, is rich in high-quality protein (about 25–30g per serving), essential for muscle repair and satiety. It also provides iron (heme form, easily absorbed) to combat fatigue, zinc for immune function, and B vitamins—especially B12—critical for nerve health. The ancho chiles supply capsaicin, a compound linked to metabolism boost and anti-inflammatory effects. They also deliver vitamin A (as beta-carotene), vitamin C, and fiber. Garlic and onions contribute prebiotic fibers that support gut microbiome diversity. Compared to chili made with ground beef, this cubed-chuck version has less surface area for fat absorption, making it moderately lower in saturated fat per serving—especially if you trim visible fat before cubing.
Dietary Advantage: This recipe is naturally gluten-free (use gluten-free broth) and dairy-free as written. It packs a high protein-to-carb ratio, making it suitable for low-carb or keto diets (skip the masa harina or replace with ½ tsp xanthan gum). For paleo, use arrowroot powder instead of masa harina—though the texture will be slightly thinner.
Tips Variations & Cooking Advice
Flavor Variations:
– Smokier Profile: Replace one ancho chile with two chipotle peppers (canned in adobo, with sauce). Add during step 4. This adds a campfire-like depth.
– Fruity Heat: Add one dried pasilla chile along with anchos; it contributes a mild raisin-like sweetness.
– Beer Addition: Replace 1 cup of broth with a dark beer (like a stout or porter). Add at step 4. The roasted malt notes amplify the beefiness. Avoid hoppy IPAs; they add bitterness.
– Coffee Enhancer: Stir in ¼ cup strong brewed coffee at the end of simmering. It doesn’t taste like coffee; it deepens the savory notes.
Ingredient Swaps:
– Meat: Leaner options like sirloin or round require shorter cooking time (60–75 minutes) but will be less flavorful. Add 2 tbsp rendered bacon fat for taste.
– Chiles: Dried New Mexico chiles are a close substitute for guajillos. For milder chili, use only anchos.
– Thickener: Oatmeal (blitzed to powder) works as a gluten-free alternative but adds subtle sweetness. Arrowroot or cornstarch should be used sparingly (1 tbsp dissolved in 2 tbsp cold water).
Alternative Cooking Methods:
– Slow Cooker: Brown beef and aromatics on stovetop first, then transfer to slow cooker with all ingredients. Cook on low for 6–8 hours. Add masa harina slurry during the last 30 minutes, then let it rest 15 minutes before serving. This method produces very tender beef but lacks the depth of stovetop reduction.
– Instant Pot or Pressure Cooker: Use sauté function for browning. Pressure cook on high for 30 minutes with a natural release (15–20 minutes). The beef will be very tender but may shred if overcooked. Reduce broth by ½ cup since less evaporates. Add masa after pressure cooking and simmer uncovered for 10 minutes.
Portion Adjustments:
– For a crowd (8–10 servings), double all ingredients. Use the largest Dutch oven you own (7–8 qt). Cooking time may extend by 30 minutes because of liquid volume.
– For a single serving, scale down to ½ lb beef but use the same amount of chiles—dried chiles keep well, and extra puree can be frozen. Simmering time reduces to 1 hour.
Dietary Adaptations:
– Gluten-Free: Already done if broth is certified GF. Use masa harina or arrowroot.
– Dairy-Free: Naturally dairy-free. Skip cheese toppings or use cashew cream.
– Low-Sodium: Use unsalted broth, omit added salt until end, and rinse canned tomatoes. Add MSG-free seasoning blends only after tasting.
– Low-Oxalate: Avoid the masa harina and use gelatin as thickener instead (mix 1 tbsp unflavored gelatin with ¼ cup cold water, allow to bloom, then stir into simmering chili).
Common Mistakes to Avoid
1. Overcooking the Beef (resulting in dry, stringy meat)
– Symptom: Beef shreds into unappetizing strings or becomes dry and chalky.
– Solution: Use well-marbled chuck, cut into uniform ½-inch cubes. simmer gently, not at a boil. Test tenderness after 75 minutes, then every 10 minutes. Remove from heat as soon as beef is fork-tender but retains its shape. Overcooking breaks down collagen too much, squeezing out moisture.
2. Under-seasoning (resulting in flat, one-dimensional chili)
– Symptom: Chili tastes like mildly spicy tomato broth.
– Solution: Salt is your primary building block, but it must be added in layers. Season the beef before browning, add salt at Step 4, and final adjust at the end. Use a pinch of MSG or fish sauce for umami depth. Toasting cumin and oregano fresh is non-negotiable; stale spices ruin chili. Always taste and adjust acidity with a squeeze of lime or splash of vinegar before serving.
3. Skipping the Chile Toasting Step (resulting in muddy heat)
– Symptom: Chili has a dull, flat chile flavor with background bitterness.
– Solution: Toasting dried chiles at medium heat for 30 seconds per side awakens essential oils and sugars. This step is the difference between a bright, layered heat and a soggy, one-dimensional one. Do not skip it for speed.
4. Adding Too Much Liquid at Once (resulting in watery consistency)
– Symptom: Chili never thickens properly despite long simmering.
– Solution: Start with 3 cups of broth instead of 4. You can always add more liquid if needed, but you cannot remove it once added. The tomatoes and chile puree also release liquid as they cook. Test thickness after 90 minutes; if too thick, add warm broth in ¼ cup increments.
5. Using Pre-Ground Chili Powder Blend (resulting in flat, metallic flavor)
– Symptom: Chili has a generic, almost cumin-heavy taste with no chile complexity.
– Solution: Pre-ground blends often contain extenders like silicon dioxide and stale chiles. Grinding whole dried chiles and whole cumin seeds at home yields exponentially better flavor. It takes 5 extra minutes but is the single most important upgrade you can make.
Storage & Meal Prep Tips
This chili is a meal-prepper’s dream—it freezes beautifully and tastes even better after a day or two as flavors meld.
Refrigeration:
– Cool chili completely (no more than 2 hours at room temperature to prevent bacterial growth). Transfer to airtight containers—glass or BPA-free plastic. Store in the coldest part of the fridge (toward the back, not the door).
– Keeps fresh: 4–5 days. The flavor peaks around day 2–3 as spices meld. After day 5, texture may degrade slightly.
Freezing:
– Cool completely, then portion into freezer-safe bags or containers. Lay bags flat to save space and speed thawing. Remove as much air as possible (press bags closed slowly to expel air, then seal). Label with date and batch notes.
– Keeps fresh: 3–4 months. After that, flavor fades and texture becomes mushy.
– Thawing: Transfer frozen chili to the fridge overnight (best for texture) or submerge sealed bag in cold water for 30 minutes (quicker but less even). Never thaw at room temperature.
Reheating Instructions:
– Stovetop (Best): Transfer thawed or cold chili to a saucepan. Add 1–2 tbsp of broth or water per cup of chili to restore moisture lost during storage. Warm over medium-low heat, stirring occasionally, for 5–7 minutes until bubbling. Avoid high heat, which can scorch the bottom.
– Microwave (Acceptable): Place chili in a microwave-safe bowl, cover with a damp paper towel (prevents splatters and retains moisture), and reheat in 45-second bursts, stirring each time. Watch for hot spots.
– Slow Cooker (For Large Batches): Set to low for 2–3 hours, stirring occasionally. Add extra liquid as needed.
Pro Tip: After freezing, chili often separates slightly. Stir vigorously while reheating to re-incorporate the fat and liquid. If it’s too loose, simmer for 5 minutes uncovered. If too thick, thin with broth.
Conclusion
Mastering a true bowl of Lone Star comfort takes patience, quality ingredients, and a few insider techniques, but the payoff is extraordinary. By toasting your own chiles, browning beef in batches, and letting time do its magic, you create a stew that is far greater than the sum of its parts—rich, smoky, and deeply satisfying, with layers of heat that build and linger. This Texas Beef Chili embodies the spirit of Texan cooking: bold, unapologetic, and rooted in tradition. While every region has its spin on Chili con carne, this version stays true to the minimalist philosophy of the Lone Star State—no beans, no fillers, just exceptional beef and chiles united in perfect harmony.
I encourage you to try this recipe this weekend. Make a double batch and freeze half for a rainy day. Once you experience the difference that fresh-toasted chiles and carefully simmered chuck make, you’ll never look at a chili packet the same way again. Tag your results on social media with the hashtag #LoneStarChili or drop a comment below sharing your personal twist—I’d love to see how you make it your own. If you’re hungry for more bold, slow-simmered meals, try my Smoky Brisket Chili with Coffee or the Classic Beef Stew with Root Vegetables.
FAQs
1. Can I use ground beef instead of cubed chuck for Texas-style chili?
Yes, but the texture and flavor profile will differ significantly. Ground beef cooks faster (about 45–60 minutes) but doesn’t produce the same tender, chunky mouthfeel that defines this regional style. If using ground beef, choose 80/20 lean-to-fat ratio and brown it well. You may also need less cooking time—check for tenderness after 45 minutes. The chili will be more like a loose, meaty sauce than a chunky stew.
2. How do I make this chili spicier without adding more chiles?
If you’ve reached your chile limit but want more heat, use these tricks: Add ¼ teaspoon cayenne pepper at the end of cooking (pure heat, zero flavor change). Stir in 1 tablespoon of sriracha or habanero hot sauce just before serving. Alternatively, serve with pickled jalapeños on top so each person can control their own burn. Adding more dried chiles will change the flavor profile beyond just heat, so cayenne is your best bet for pure spice.
3. My chili turned out too thin. What went wrong?
Several factors can cause a watery chili: using too much broth (start with 3 cups instead of 4), not simmering uncovered long enough to reduce, using low-sodium broth that doesn’t concentrate as quickly, or adding vegetables (onions release water, but you can’t avoid that). To fix a thin chili without losing flavor, whisk 1–2 tablespoons of masa harina into ¼ cup warm water until smooth, then stir into the simmering chili. Cook uncovered for 10 minutes. Alternatively, mash some cooked beans or potatoes and stir them in (though authentic Texas chili purists may frown). Avoid adding flour directly—it creates a gluey paste.
4. Can I make this chili vegetarian or vegan?
While this specific recipe is beef-centric, you can adapt it for plant-based diets with careful substitutions. Use 2 lbs of diced portobello mushrooms (meaty texture) or 1 lb firm tofu (pressed well and cubed), plus 1 can of black beans or pinto beans (though beans are non-traditional for Texas chili). Replace beef broth with high-quality mushroom or vegetable broth. Sauté mushrooms with the same techniques—they need browning too. The chile base remains the same. The flavor won’t mimic beef exactly, but the smoky, spicy profile holds up beautifully without meat. Simmer time reduces to 45–60 minutes.
5. How long should I simmer the chili if I’m using a slow cooker (Crock-Pot)?
Slow cooker Texas chili should simmer on low for 6–8 hours. However, you must brown the beef and aromatics on the stovetop first—skipping this step loses all the deep, caramelized flavor that makes this dish special. After browning, transfer everything to the slow cooker, add broth and chile puree, and cook on low. Add the masa harina slurry during the last 30 minutes, then
Proven way to grow Texas Beef Chili in 3 steps
Ingredients
Equipment
Method
- Heat vegetable oil in a large Dutch oven or heavy-bottomed pot over medium-high heat.
- Sear the beef chuck roast in batches until browned on all sides, then remove and set aside.
- Add chopped onion to the pot and sauté until softened; then add minced garlic and cook for another minute until fragrant.
- Stir in the ancho chili powder, chipotle chili powder, cumin, oregano, and cayenne pepper, cooking for one minute until aromatic.
- Return the beef to the pot, then pour in beef broth and tomato paste, mixing well.
- Bring the mixture to a simmer, then reduce heat to low, cover, and cook for 2-3 hours, or until the beef is fork-tender.
- Once the beef is tender, stir in the masa harina to thicken the chili, cooking for 10-15 minutes.
- Season with salt and black pepper to taste, and add minced jalapeño if desired for extra heat.
- Serve the Texas Beef Chili hot, garnished with your favorite toppings like shredded cheese, sour cream, or chopped green onions.